Adjust Payment Terms ×

We want to help you find the perfect car that fits your budget. Please adjust the options below so we can estimate the most accurate monthly payments.

Estimated Credit Score or Interest Rate

Desired Loan Term (months)

How much will you put down?

All tax, title and vehicle registration fees are additional. See dealer for complete details.

How Often Should You Check the Health of Your Car?

By jibarra | Posted in Uncategorized on Thursday, August 2nd, 2018 at 7:29 PM

You rely on your car to keep you and your loved ones safe as you travel day to day. Carelessness towards (or not even knowing) the health of your car can cause a snowball effect that leads to a multitude of expensive problems down the road- and NO ONE wants to be that broke down minivan stranded on the side of I-15 in the middle of a snowstorm with 3 grumpy kids in the backseat, or the shiny sports car that’s lost most of its value due to poor maintenance.

Here’s how often you should be prioritizing health checks of your car and make sure everything is in order. Following this schedule will allow you to catch any potential problems early on before they become major headache-inducing issues down the road. It’s best if these regular inspections are done by professionals who can examine everything with a critical, trained eye.

Every Month

Once a month, make sure to check your oil levels. Add oil, coolant, and antifreeze. If any levels are low, top them off or swing by and we’ll be happy to do it – most times at no charge. While you’re at it, make sure to check for any potential leaks by backing up from your normal parking spot and scanning for drips. Do a quick scan of your hoses and note any that appear to be bulging at the ends, soft or make a brittle ‘crunch” sound when you squeeze them.  Examine your belts. They may need to be replaced if they look work, frayed, or glazed. Check your tire pressure and add air if too low (check your car’s recommended pressure on the sticker printed on the door, 32-35psi is normal for most cars). Also inspect your tires for damage, bulges, poor tread, or uneven wear. This may be a sign that it’s time to replace them. Finally, do a quick examination of your air filter by holding it up to the light and see if you can see light through it. If you can’t, replace it!

Every 3 Months

Typically your oil and oil filter needs to be changed every 3,000 miles (usually ~ 3 months) or as recommended by your vehicle’s manufacturer. Check your windshield washer fluid, power steering fluid, and transmission fluid, adding extra if levels are low (if they are really low,get that checked out right away!). Examine your battery terminals and cables, cleaning them if any corrosion is spotted. Lastly, do a quick check of all your lights to ensure that all lights (including turn signals) are working properly. Have a friend or family member step on the brake pedal with the headlights on to make sure your brake lights work – we can’t believe the number of cars we see running around with only 1 brake light working!

Every 6 Months

These bi-annual checks are really critical to preventing any long-term damage. Look at your wiper blades and replace if they appear in any way worn, brittle, or smeary. Test your horn and make sure it works properly. Inspect your brakes for any unusual wear and tear. Check your spare tire to ensure it’s still fully inflated. Take a look at your exhaust system, keeping a close eye out for rust, damage, or loose parts. Finally, inspect your shocks for oil seepage or wear.

Following this schedule on a routine basis will enable your car to stay in the best shape possible. Doing monthly, quarterly, and bi-annual “check-ups” may help to prevent major issues from sneaking up on you and the least opportune moment while simultaneously keeping the resale value of your car at its highest. As always, we can help perform these critical maintenance checks for you at your convenience at our shop.

9 Road Trip Hacks for Ultimate Comfort

By jibarra | Posted in Uncategorized on Tuesday, July 17th, 2018 at 3:53 PM

Hands up, while driving a convertible.

The idea of traveling is exciting! The overall adventure is awesome! It’s the journey that can often feels long, exhausting or even stressful.

Whether you’re in a cramped car with not much leg room, or stuck in the vehicle with no opportunity to stop for snacks or a bathroom break, there’s a whole ream of reasons why road trips can be tiring and uncomfortable. That’s why 57 percent of travelers hit the road feeling “stressed” about where they are going to stop along the way.

I’ve been on more road trips and traveled more miles than I can count, so I’ve tried virtually every trick under the sun in an effort to make the journeys a little more manageable. Some, while effective, are boring and uninspiring (I’m looking at you, Mr. bottled water), while others work well every time. Here’s a quick run-down of my favorite road trip hacks to make every road trip comfortable and–dare I say…enjoyable.

ROAD TRIP HACKS TOPIC #1 – PACK WISELY

Nothing is worse than stopping halfway into a road trip and realizing that your sunglasses are in the bag in the deepest, darkest corner of your trunk, packed beneath a tower of other bags, bedding, food and travel accessories.

Before you leave, take some care to pack your car wisely. First, pack anything that isn’t essential or that you’re unlikely to need on the journey. Leave the essentials like first-aid kit and the snacks at the top of your bags and near the doors where they’re easily accessible in times of need. And of course, make sure those sunglasses are in the glove box or other nearby area to the driver’s seat.

ROAD TRIP HACKS TOPIC #2 – PREPARE YOUR CAR

You should always give your car an all-round check before any journey, but even more so before a long road trip. Check that your fuel tank is full, your tires are pumped, test your brakes and check the oil and other fluids. Don’t forget to check the spare tire for proper inflation, this often goes overlooked. Lastly, don’t forget some wet wipes, you’ll thank me later for this last suggestion.

ROAD TRIP HACKS TOPIC #3 – GET COMFORTABLE

If you’re not the driver, you can afford to use your time on long road trips to sit back, relax and catch up on some sleep. However, getting comfortable is easier said than done. You may have tried travel blankets or those soft U-shaped pillows which are designed to support your neck, but my long search for the ultimate travel pillow led me to cooling pillow. These use a combination of cooling gel and airflow to keep you cool and comfortable for hours at a time. Now, the days of getting hot and sticky in a stuffy vehicle are a thing of the past.

ROAD TRIP HACKS TOPIC #4 – PREPARE AND EMERGENCY KIT

Keep a kit somewhere in the main cabin of your car to help you out in a variety of emergencies. This should be more than just a first aid kit: this is an emergency kit for all aspects of life. You can include everything from painkillers and a bottle of water to a portable phone charger and a flashlight. Don’t forget to include a card with some important phone numbers (including your insurance) and some spare cash to save your skin if you run out of gas. Also consider; some basic tool (screwdrivers, adjustable wrench, pliers, etc), duct tape, flairs, fire starter, jumper cables, straps and maybe some rope.

ROAD TRIP HACKS TOPIC #5 – SAVE DATA

You’d be surprised at how much data can be used up on a long road trip, especially if you use GPS and stream music while you drive. If you can, plan ahead by downloading music to keep you entertained, take screenshots of any important information, familiarize yourself with the route, and even consider taking along a traditional map to help you find your way. One trick while using your GPS is to get the route loaded, but then close the navigation when you have a long stretch to drive. In other words, don’t leave Google Maps running for hours on end if you don’t need it. You can also wait until you stop and use a local WiFi hot spot, many rest stops, stores and hotels now have it available. Not only will this save you from high data fees, but it will also reduce your battery usage. Note: Roaming and 3G (or less) takes a stronger signal strength, so your battery usage will go up. 4G/LTE uses the least amount of battery.

ROAD TRIP HACKS TOPIC #6 – EAT SMART

Long road trips can mean regular eating out, and whether you’re traveling alone or in a group the cost of this adds up very quickly. Being a smart road tripper is all about finding good deals – including on your food. Loads of towns have community kitchen concepts, where you either pay what you can afford or do some cleaning up afterward. You’ll get good meals while keeping costs down, and you’re guaranteed to share a unique experience with some inspirational locals.

ROAD TRIP HACKS TOPIC #7 – SAVE ON LODGING

Traveling on a budget isn’t easy, but did you know that there’s a legitimate way for you to sleep for free? As long as you make them aware of what you’re doing, you can park and sleep in any Walmart parking lot. Sure, sleeping in your car isn’t as comfortable as a luxurious bed, but it’s safe, it’s well-lit, it’s FREE, and it’s legal! Airbnb is also another great option for inexpensive lodging. If you’re dubious about using the app, don’t be. Millions of people are using this service around the world. Be sure the check out the ratings and all the details for the lodging type to make sure it suites your needs.

ROAD TRIP HACKS TOPIC #8 – TAKE REGULAR BREAKS

This is one of my more sensible road trip hacks, but it can be fun as well as serving a purpose. It’s recommended that you stop for at least fifteen minutes for every two hours of driving, but you should include some longer stops if you’re feeling tired. However, you can turn a normal break into an awesome feature of your road trip by using it as an opportunity to explore the area. See the sights; visit a local restaurant; go for a walk; whatever you choose to do, get out of the car, stretch your legs and have an adventure.

ROAD TRIP HACKS TOPIC #9 – ASK THE LOCALS

In any journey, the best way to find your way around is by talking to the locals or see if your trip is on my featured road trips list. The locals will know where to find the cheapest gas, the places that make the best food, and all-round the best ways to see the area. Take their advice, because in my experience you’re likely to find some hidden gems this way. The businesses and establishments which are geared up for the locals rely on repeat custom to secure their reputation and to survive, so you can be pretty sure that you’ll find great quality and an unforgettable experience!

I hope you have found these road trip hacks helpful. If you have any questions or some useful road trip tips yourself, please leave a comment below.

source: mikesroadtrip.com

10 Ways To Protect Your Car This Summer

By jibarra | Posted in Uncategorized on Monday, July 9th, 2018 at 10:32 PM

  1.  Keep your cool – Staying cool is important not just for you, but also for your car.  Beyond checking the level of coolant fluid in your car, be sure to inspect the state of the hoses and coolant reservoir to keep an eye out for leaks.  Squeeze the hoses (when the engine is cool) from time to time to make sure they feel firm and not excessively squishy or soft
  2. Tighten up your belt – There usually is a serpentine belt that runs between the alternator, the fan and several other components that can become loose or deteriorate over time.  It needs to be in good condition and at the right amount of tension, so if you see cracks or small pieces missing, it’s time to replace the belt.
  3. Clear your vision – Summer rain showers really can do a number on wearing out your windshield wipers, creating nasty streaks across your windshield and affecting your vision while driving.  Replacing your wipers is not costly but can be a fiddly operation, so you may want to inquire about wiper installation during your regular oil changes or a dealership visit.
  4. Stay hydrated – Check oil, brake, power-steering and windshield-washer fluids regularly, as these liquids are in constant use and are key to your vehicle functioning properly.
  5. Crank the air – Air-conditioning is a summer essential, so if the system hasn’t been working properly in recent months, summer certainly is the time to get serious about repairing any leaks or issues.  Have a qualified mechanic fix the leak before paying to have the air-conditioning system recharged.
  6. Clean your filters – Summer is the time to take out your air filter to give it a good cleaning, or buy a new filter if needed.  Many modern cars also have pollen filters or cabin filtration systems, so be sure to take a look at those, too.  And as always, when in doubt, consult a qualified technician.
  7. Under pressure – Tires really need to be checked regularly all year round, and summertime is no exception.  Pressures must be correct (consult the manual for levels specific to your vehicle), treads should be free of stones, stray nails and the like, and all four tires should be in good condition (meaning no cracks, no uneven wear and plenty of tread depth).  Don’t forget to also check your spare to ensure it is usable.
  8. Throw some shade – Don’t underestimate the greatness of a dashboard sunshade for those times you are not driving but the car is still out in the sun.  It helps protect the dashboard and interior against ultraviolet rays and can help prevent fading over time, and in the short-term, it helps the cabin stay a little cooler.
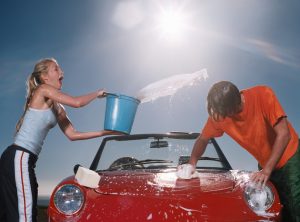
  9. Keep it clean – Those long, balmy evenings when the sun seems to hang low for hours can be lovely, but also hazardous if your car’s windshield is dirty.  The haze on your windshield can diffuse the light and make things hard to see, so keep your car’s exterior clean.  Things look much sharper after your car has had a good wash, and regular washings protect the paintwork from the sun’s rays.
  10. Plan accordingly – It’s hot out there, so keep both the driver and passengers happy by keeping everyone hydrated. Plan road trips by making lists of what you’ll need to keep everyone in the car happy while on the journey (examples:  sunglasses, travel mugs, games for the kids, snacks, phone chargers and more), and don’t forget to have those just-in-case items like a flashlight and small tool kit handy.  Be sure your license and insurance are up to date, and that you’re keeping tabs on your vehicle’s scheduled service.

Source: Autotrader


What to Do If Your Car Is in a Flood

By jibarra | Posted in Uncategorized on Wednesday, June 27th, 2018 at 7:33 PM


Image result for flooded cars in weslaco

Immersion in water can wreak havoc with a car, especially an engine, electrical system, and interior. If your car has been immersed in water more than halfway up its wheels, follow these ten steps to assess and address the damage.

1. Do Not Attempt to Start the Car!

It’s tempting to turn the key and see if the car still works, but if there is water in the engine, attempting to start it could damage it beyond repair. I’ve outlined a few basic checks below, but if in doubt, its best to have the car towed to a mechanic.


2. Determine How Deep the Car Was Submerged

Mud and debris usually leave a waterline on the car, inside as well as out. If the water didn’t rise above the bottom of the doors, your car will probably be fine. Most insurance companies will consider the car totaled (damaged beyond economically-reasonable repair) if water reaches the bottom of the dashboard.

 3. Call Your Insurance Company

Flood damage is generally covered by comprehensive (fire and theft) insurance, so even if you don’t have collision coverage, you may be covered for repairs or replacement. Your car insurance company will probably be flooded (sorry) with claims, so it’s a good idea to start the process early. (More about floods and car insurance)

4. Start Drying the Interior

 If water got inside the car, mold will grow quickly. Start by opening the doors and windows and putting towels on the floor to soak up water, but you should plan on replacing anything that got wet, including carpets, floor mats, door panels, seat padding, and upholstery. Remember, these repairs are likely to be covered by your comprehensive insurance.

5. Check the Oil and the Air Cleaner

 If you see droplets of water on the dipstick or the level of the oil is high, or if the air filter has water in it, do not attempt to start the engine. Have it towed to a mechanic to have the water cleared and the fluids changed. (Hard-core do-it-your self can try changing the oil then removing the spark plugs and cranking the engine to blow out the water, but we still recommend leaving this to a mechanic.)

6. Check All the Other Fluids

Fuel systems on late-model cars are usually sealed, but older cars may need to have their fuel systems drained. Brake, clutch, power steering and coolant reservoirs should be checked for contamination.

7. Check All of the Electrical Systems

 If the engine looks OK to start, check everything electrical: Headlights, turn signals, air conditioning, stereo, power locks, windows and seats, even the interior lights. If you note anything even slightly amiss — including the way the car runs or the transmission shifts — that could be a sign of electrical trouble. Take the car to a mechanic, and remember that the damage may be covered by insurance.

8. Check Around the Wheels and Tires

Before attempting to move the car, look for debris lodged around the wheels, brakes, and underbody. (Set the parking brake before crawling around the wheels!)

9. If in Doubt, Push to Have the Car Totaled

A flood-damaged car can experience problems months or even years after the event. If your car is a borderline case, consider pushing your insurance company to declare the car a total loss. Replacing it will cost money, but you may save yourself from some major (and expensive) headaches down the road.

10. Beware of Flood-Damaged Replacements

Many cars that are totaled due to flooding are simply cleaned up and re-sold. Before buying a used car, have the title checked; words like “salvage” and “flood damage” are giant red flags. Get a comprehensive history on the car — if the car has been moved from another state and re-titled (especially a state that has been subject to flooding just before the title change), the seller may be trying to hide flood damage.

Source: ThoughtCo.

Car Upholstery Cleaning – DIY With Cheap and Simple Home Remedies

By jibarra | Posted in Uncategorized on Monday, June 18th, 2018 at 5:04 PM

Common concerns when cleaning car upholstery

A common misconception when cleaning any kind of upholstery is that the more water used, the better the result. This could not be further from the truth as more water doesn’t necessarily mean more effective stain removal. Moisture is extremely bad for the fabric, and can damage the fabric as well as leave the interior of the car with a dump or musty smell. Another point to note is to avoid getting water on any metal portion of the seat such as zippers. This can lead to rust, and more stains to deal with in the future. With these two important points in mind, below is how to use home remedies to clean your car upholstery.

[ads1]

Removing smells from car interior

It is common for car upholstery to absorb stains and odors over time. Before starting any kind of cleaning on the car seats, the first step is to deal with the smell.

Removing smells from car interior can be done in 5 easy steps:

STEP 1: Fill two bowls with white vinegar.

STEP 2: Place one bowl on the dashboard of the car and the other on the back seat the night before cleaning.

STEP 3: Close all the windows and doors and leave the bowls over-night. The white vinegar should effectively absorb all the odors from the car.

STEP 4: Remove the bowls of vinegar in the morning and leave the car doors and windows open for as long as it   takes for the smell of vinegar to completely disappear.

STEP 5 (optional): The last step is to vacuum clean your car upholstery thoroughly and take stock of the stains that need to be dealt with as the car is airing out.

Getting rid of stains on car upholstery

Before starting the stain removal process, you’ll need to prepare the following two homemade cleaning solutions:

For the first part of the cleaning you’ll need:

  • ¼ cup of baking soda
  • 1 cup of warm water

Mix together the baking soda and water and you’re ready for the second part.

For the second part of the cleaning process you’ll need:

  • Warm water
  • A few squirts of dish detergent and a
  • ¼ cup of vinegar in
  • A spray bottle

Mix the warm water, the few squirts of dish detergent and the ¼ cup of vinegar in a spray bottle. Shake the mixture well and leave for 5 minutes to set.

And now we’re ready to start cleaning the car upholstery:

STEP 1: Use a toothbrush to gently apply the baking soda and water solution to any stains that you might have on the upholstery and leave the solution for 30 minutes to penetrate the stains (This is by the way a great cleaning procedure for stubborn stains including ketchup and coffee stains among others)

STEP 2: After the half hour, use a clean dry towel to blot the stains with the baking soda and water. Be careful to absorb as much liquid as possible before commencing the next step in the car upholstery cleaning process.

STEP 3: Use the detergent, water and vinegar mixture to spray the upholstery starting with the front seats and working your way to the back.

STEP 4: After spraying the seats, use a stiff-bristled brush to gently work in the solution.

STEP 5: Leave the mixture to sit for 15 minutes on the seats, and then use dry towels to absorb excess moisture.

STEP 6: The last step is to air out the car to get rid of any smells. You may want to leave all the car doors and windows open for the rest of the day or until all the cleaning smell is gone.

Other alternative car upholstery cleaning solutions

Baby wipes: These work surprisingly well when cleaning car upholstery. You don’t necessarily need soap and water to clean your car seats. Baby wipes are a great alternative, and should get most stains out. They don’t contain abrasive chemicals, which is especially great for the environment and safe for people with small children and adults with sensitive skin or allergies.

Dry cleaning cloths: Dry cleaning cloths such as Dryel are also great for cleaning car upholstery. They are easily accessible, and are effective car upholstery cleaners. – An additional bonus for using Dryel or other brands of dry cleaning cloths is that they leave the car smelling great.

Club Soda: Club soda is also another great stain remover worth considering. This works especially well for vomit stains on car upholstery. Club soda is cheap and easily accessible, and offers a thorough cleaning job at a fraction of the price. A mixture of baking soda and water also works great as an alternative for cleaning car upholstery and getting rid of stubborn stains.

Clear ammonia: A mixture of clear ammonia and water can be used to brighten the color of the carpets. Over time, the color of the carpets may begin to fade. This mixture can help restore the color, and have the car carpets looking great even after many years of service.

Source: bestdiy.tips

CORRECT TIRE PRESSURE

By jibarra | Posted in Uncategorized on Monday, June 11th, 2018 at 7:27 PM

A Few Things to Keep In Mind

When it comes to keeping your tire pressure right, there are a few things to consider

  • Always set your tires to the pressure specified in your vehicle’s owner manual or tire information placard.
  • Always check and adjust your tire pressure before driving.
  • Temperature differences affect your tire pressure. Cold, winter weather may cause your pressure to drop, while warm, summer weather may cause your pressure to increase. Although you should check your tire pressure periodically as part of good vehicle maintenance, it is exceptionally important to check it when the season changes.
  • Always check your tires with a good quality tire pressure gauge. Many vehicles come equipped with a tire pressure monitoring system (TPMS). Generally, this system will alert you if your tires are losing air or are below the recommended pressure. We recommend keeping a tire pressure gauge in your glove compartment—even if you have a TPMS built into your vehicle. This will ensure you are getting a consistent reading each time rather than using multiple gauges at different gas or service stations. If you suspect your TPMS system is malfunctioning, we offer TPMS service package designed to fix the faulty component.

Overinflation

Overinflated tires are rigid and stiff, causing the tire’s contact patch (the amount of rubber that meets the road) to be reduced. That leads to a “harder” ride as well as uneven tread wear. The most common type of uneven tread wear due to overinflation is referred to as “center wear.” Exactly what it sounds like, the center of the tire will be smooth and worn down while there will be more tread on the sides of the tire. Due to the rigidity of an overinflated tire, it can be more easily damaged by everyday road hazards such as potholes and imperfections in the road.

Underinflation

Underinflated tires do not hold their shape and are flatter to the ground. Therefore, more of the tire comes in contact with the road, causing the shoulders of the tire to wear prematurely. That is referred to as “shoulder wear.” There will be a strip of normal tread down the center of the tire, while the shoulders of the tire will be smooth and worn down. Underinflated tires are more flexible when they roll, leading to increased rolling resistance and therefore a decrease in fuel economy.

Source: Pep Boys

Blues On The Hill

By jibarra | Posted in Uncategorized on Monday, June 11th, 2018 at 7:07 PM

bluesBlues on the Hill is an annual concert series that features national and international Blues Music Artists.  The event has been a family oriented cultural event in Harlingen for the last 12 years. Blues on the Hill was started in May 2000 as a collaboration between Tom Wilson, the late Parks and Recreation Director, Jeff Lyssy and Mike Jaramillo from Harlingen Parks and Recreation, and Chris Maley from Public Radio 88.1FM. Blues on the Hill is FREE to the public.  The event is supported by the generous donations from local businesses and volunteers.

Efficiency at the Pump – How to Save Money at the Gas Station

By jibarra | Posted in Uncategorized on Tuesday, May 29th, 2018 at 8:40 PM

With gas prices on the rise, learning to save money at the gas station is one thing savvy drivers can do to help take some of the sting out of their wallets. Use these tips to maximize your savings and get more out of every mile.

From the time you fill up your tank, to what you do after you fill it, there are several ways you can save a few bucks at the pump.

Fill Up Early

Gas expands and contracts about 1% for every 15 degree change in air temperature. What this means for you is that when you fill up your tank when the gas is warm, you’re actually getting less than you think, because the gas is expanding to fill more space. Once the gas in your tank cools, it contracts and shrinks.

Gas tanks get progressively warmer as the day goes by, so to make sure you are getting the densest gas, fill up early in the day while the tanks are the coolest.

Avoid Delivery Times

If you can’t fill up right when the gas station opens, the next best thing to do is to avoid filling up right after a station has taken a delivery of new gas. Gas delivered right from the refinery is much hotter than it is even sitting in a tank on a hot day, which means if you purchase at this time you’ll be paying for a lot more than you receive.

Don’t Top Off

Topping off your gas tank – or continuing to pump after the nozzle has automatically stopped – can really add a lot of unnecessary costs to your fill up. This is because most nozzles are fitted to take up any extra gas and cycle it back to the pump. Unfortunately, this happens after the meter has recorded the sale, so you’re paying for gas you don’t even get. Instead, once the pump stops put the nozzle back on the tank to ensure you only pay for what you receive.

Tighten Your Gas Cap

Gas not only expands at higher temperatures, a portion of it also turns into a gas or vapor that escapes into the air. A loosely fitting gas cap means that those vapors are escaping out of your tank, rather than condensing back into gasoline once the temperatures drops. Taking the time to tighten up your cap after each fill up ensures you’re getting the chance to use the gas you paid for.

Pump a Little Slower

Most nozzles are set to pump gas at three speeds – slow, medium, and fast. Pumping at high speeds releases more gasoline vapors, which your nozzle pulls back in with a vapor recovery system most pumps are outfitted with. This means you could be paying for more gas than you receive. Pumping at a slower rate releases fewer vapors, which means you’re receiving more of the gas that you paid for.

Use Regular Gas

If you’ve been filling up with premium gas because your owner’s manual recommends it, your car could do just as well on regular, letting you pocket the difference. Premium gas really only burns better in hot, high performance engines, while most cars run just fine on regular. If your owner’s manual says that premium is required then by all means use it; if it’s only recommended, however, you probably won’t notice a difference if you switch.

In addition to the ways you can save money at the pump, there are a few other things you can do to help maximize your car’s gas mileage and save money in the long run:

  • Keep your tires filled: Low tire pressure decreases your gas mileage making you fill up more often.
  • Get frequent tune ups: If your engine isn’t performing optimally, it could be using more gas than it needs.
  • Change your air filter: If your car is older, a dirty air filter could cause it to burn more fuel. Newer cars can adjust for this, however, so check your manual to see if it’s necessary.

Gas prices aren’t dropping any time soon, so make sure you’re getting your money’s worth every time you fill up. Follow these tips to save money at the gas station, and know you are maximizing how far your car – and your money – can go.

Source: Northern Virginia Roofing

What to Do If Your Car Overheats: 5 Must-Know Steps

By jibarra | Posted in Uncategorized on Monday, May 21st, 2018 at 3:35 PM

When the mercury begins to rise outside, it’s common for car engines to get overly toasty too. Thankfully, there are plenty of things you can do to make sure a temporary jump in temperature doesn’t lead to long-lasting trouble. To help you know what to do if your car overheats, here are 5 easy steps.

  1. First, always carry an extra bottle of coolant (also called antifreeze) in your car, as well as a jug of water. Engines typically overheat because the coolant’s low, so topping it off will usually solve the problem. Failing that, water will also temporarily do the trick. Plus, that water could be a lifesaver on long, sweltering summer drives. Just don’t drink it all.
  2. When you see the temperature gauge creeping into the red or a notification light glowing, immediately turn off your air conditioner (since the AC puts a lot of strain on your engine).
  3. If the problem persists, crank your heater up to full blast. It could make the next few miles a pretty brutal experience, but the transfer of heat away from the engine might just save its life.
  4. Should the preceding steps fail, pull over as soon as you can. Turn off the engine. If you can pop the hood from the driver’s seat, do so — but don’t risk opening it by hand until the engine has cooled, especially if you see steam wafting off the engine. It typically takes a solid 30 minutes for an engine to cool down enough for it to be safe to handle. If you’d rather let a professional handle the problem, it’s time to call for a tow truck.
  5. Once the engine has cooled, check the coolant tank. It’s usually a translucent plastic tank near the radiator. If the coolant tank is empty, you may have sprung a leak. Take a quick look under the car. If you notice a drip or puddle, chances are the coolant tank is leaking.

If you do have a leak, carefully open the radiator cap. Place a cloth over the radiator cap to protect your hand, and tilt the cap away from you as it opens. Refill the cooled radiator with your spare coolant or water. Do not pour cold water into a still-hot radiator — it could cause the engine block to crack due to the sudden change in temperature. If you absolutely have to add water while the engine is still warm, pour slowly while the engine is running in neutral or park.

Note that most cars require a 50/50 mix of coolant with water to prevent overheating, so you won’t be able to drive indefinitely with nothing but water. If you don’t have coolant on hand when your car overheats, make sure to add a comparable amount of coolant as soon as possible.

If the coolant tank is full, the problem may be electrical or mechanical in nature, in which case a tow to the nearest repair shop is definitely in order. A leaking hose, worn or broken fan belt, bad water pump, or malfunctioning thermostat may be the culprit.

What to do if you’re in traffic

Being in traffic when your car begins to overheat can make the situation that much more stressful. But it’s important that you let your cooler head prevail and follow these tips:

  • If you’re stopped in traffic, put the car in neutral or park and rev the engine a bit. This will encourage water and air flow through the radiator, helping to cool it.
  • If you’re in stop-and-go traffic, aim to creep rather than alternating between braking and accelerating. Braking generates a lot of friction, which will only turn up the heat.

If the needle’s in the red

It’s not common for contemporary cars to overheat, and it’s never a good thing, regardless of your vehicle’s age. If you find that your car often gets a little hot under the hood, it’s probably an indication of a larger problem, so consult your repair shop or trusted auto expert.

In the summertime …

Keep the livin’ easy by watching the temperature gauge, storing bottles of water and coolant in the back, and maybe even stashing this list in your glove compartment. You don’t want a volcanically hot engine ruining your summer road trip — or worse yet, your engine.

Source: John Moore Williams (esurance)

Hello world!

By Product Expert | Posted in Uncategorized on Friday, April 20th, 2018 at 1:49 PM

Welcome to DealerFire Blogs. This is your first post. Edit or delete it, then start blogging!